Introduction: Why Prepping Is the Most Important Step
Alright, let’s be real for a second.
Dealing with bed bugs? It’s the stuff of nightmares. These tiny, blood-sucking invaders can turn even the coziest bedroom into a battlefield of bites, anxiety, and sleepless nights. If you’re here, you’ve probably already bought some bed bug spray, or maybe you’re hiring a professional. Either way, prepping your room is the number one step that determines whether your spray is going to work or flop.
Let’s put it this way: spraying without prepping is like putting a Band-Aid on a broken pipe—it won’t stop the problem at the source.
But don’t worry. I’ve got you covered. This guide is more than just a checklist. It’s your room-prep guideline.
Understanding Bed Bugs: Know Your Enemy
Before you can prep like a pro, you need to know exactly what you’re dealing with.
Bed bugs are:
- Flat, oval-shaped insects (about the size of an apple seed).
- Experts at hiding in cracks, folds, and seams.
- Nocturnal feeders that bite humans for blood.
- Capable of surviving months without feeding.
- Rapid reproducers—females lay hundreds of eggs.
They love to nest in:
- Mattress seams.
- Box springs.
- Bed frames.
- Behind baseboards.
- Under carpets.
- Inside electrical outlets.
- Behind pictures and wall decor.
Can you imagine how it feels to sleep knowing these little guys are creeping around? Ugh. Horrible, right?
That’s why we need to leave no stone unturned when we prep.
Why Room Preparation Matters for Bed Bug Spray to Work
Imagine trying to water a garden with a sprinkler, but half the plants are covered with tarps. You’d never reach them.
That’s what it’s like using bed bug spray in an unprepared room. Sprays (even the strong professional ones) only work if they make direct contact with bed bugs or get into the places where bugs hide.
If your room is cluttered or unclean:
- Spray won’t reach nesting areas
- Eggs will remain safe and hatch later
- Bugs may hide and repopulate
Proper room prep:
- Exposes hiding spots
- Reduces re-infestation
- Makes your treatment more efficient
- Saves you time, energy, and money in the long ru
Step-by-Step Room Prep Guide
Declutter the Room
Clutter = heaven for bed bugs.
Start by removing:
- Clothes off the floor
- Bags, boxes, and books
- Toys, electronics, and laundry baskets
Put everything in sealed plastic bags or bins. Sort into:
- To be washed
- To be discarded
- To be inspected and treated
Tip: Don’t move stuff to other rooms unless they’ve been treated. You don’t want to spread the infestation.
Strip and Bag All Bedding
Remove every piece of bedding:
- Sheets
- Pillowcases
- Blankets
- Mattress protectors
- Duvet covers
Place each item immediately in a sealed bag to prevent bugs from falling off into your clean space. Even pillows should be bagged.
Wash and Heat-Treat All Fabrics
Wash all bagged fabrics using:
- Hot water (at least 60°C/140°F)
- High heat drying for at least 30 minutes
This kills:
- Live bugs
- Nymphs
- Eggs (yes, even those sticky little horrors)
Important: Don’t just dry damp clothes. Dry clean items before washing them to ensure egg death.
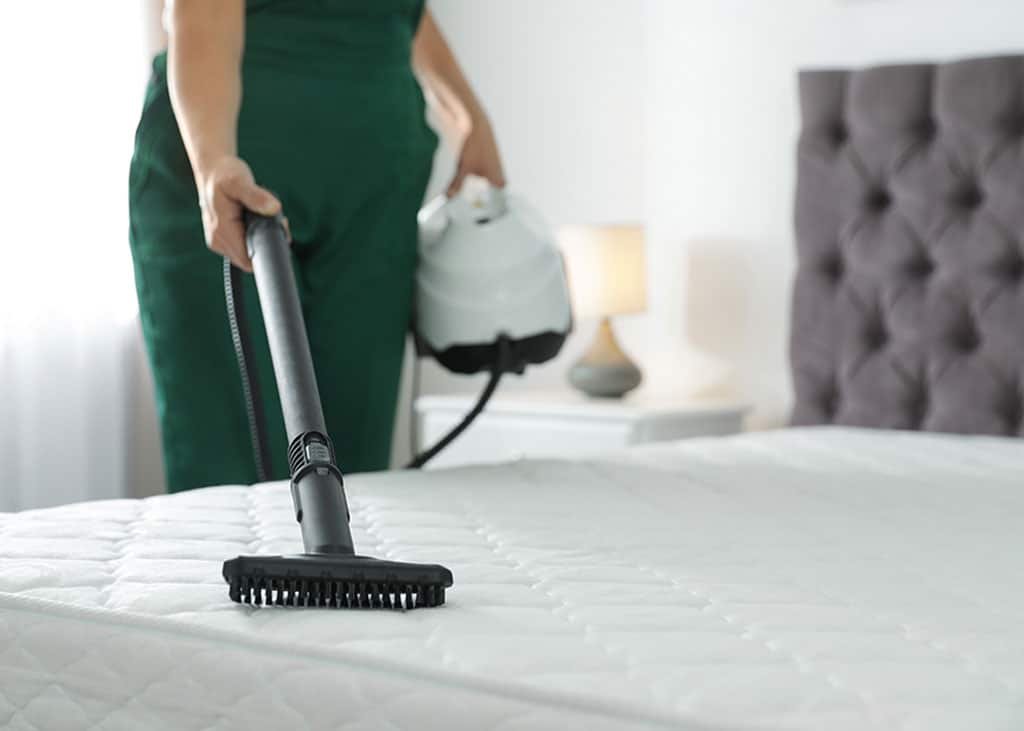
Prep Your Mattress and Box Spring
- Remove mattress encasements or covers
- Vacuum thoroughly along seams, tufts, folds
- Lift and inspect the underside
- Do the same for your box spring
If your mattress is too infested or ripped open—consider discarding it.
Deep Clean with a Vacuum
Use a vacuum with a crevice tool to hit:
- Baseboards
- Floor edges
- Under bed and dressers
- Cracks in hardwood or tile
- Inside drawers and closets
When done:
- Immediately seal and dispose of the vacuum bag
- If bagless, clean the container with hot soapy water and disinfectant
Why it matters: Eggs and bugs cling to dust and can reattach to surfaces if you don’t vacuum right.
Empty and Clean Furniture and Closets
Open and empty:
- Dressers
- Closets
- Bookshelves
- Under-bed storage
Treat everything inside the same way:
- Bag it
- Wash or inspect it
- Isolate if clean
Don’t leave anything behind—not even that one “clean” drawer. Bed bugs are sneaky.
Move Furniture Away from Walls
Shift beds, nightstands, dressers:
- At least 18 inches away from the wall
- Allows full spray access to baseboards, corners, and under furniture
You don’t need to drag things across the house—just enough to give pest pros room to maneuver.
Unplug Electronics and Remove Outlet Covers
Yup—bed bugs even hide in:
- Game consoles
- TV remotes
- Charging ports
- Light switch plates
Unplug electronics and either seal them in bags or isolate them in non-infested rooms. If you’re hiring a pro, let them know where you’ve seen bug activity in your tech gear.
Remove Wall Hangings and Decorations
Take down:
- Posters
- Clocks
- Wall-mounted shelves
- Artwork
- Picture frames
Bed bugs love the darkness behind these. You’d be shocked what hides behind a family photo.
Seal and Separate Cleaned Items
Once items are washed or treated:
- Store them in fresh plastic bags or sealed totes
- Label as “cleaned”
- Don’t open them until the room is fully treated and safe
This prevents cross-contamination.
Protect Pets and Plants
Remove all pets (dogs, cats, birds, etc.) from the room. Fish tanks?
- Cover securely with plastic
- Turn off air pumps
Move houseplants to a safe space. Chemicals and small lungs don’t mix.
During the Treatment: What to Expect and What to Do
If you’re DIY-ing it:
- Follow the label exactly
- Wear gloves and a mask
- Ventilate the room
If a pro is handling it:
- You’ll likely need to vacate for 4–6 hours
- Keep the area off-limits during drying
Important:
- Don’t walk barefoot in freshly treated areas
- Keep pets out until it’s dry and aired
Post-Treatment: What Happens After the Spray
Don’t clean right away! The residual spray needs time to work—some sprays keep killing bugs for up to 14 days.
Your next steps:
- Wait at least 2 weeks before vacuuming treated areas
- Re-inspect weekly for signs (fecal spots, skins, live bugs)
- Reapply treatment if recommended
- Install mattress encasements
- Keep bedding off the floor
Re-infestation is possible if even one egg survives. Vigilance is your new BFF.
Alternative or Supplementary Options
Want to supercharge your bed bug battle?
Consider:
- Diatomaceous Earth (DE) – non-toxic powder that kills via dehydration (great around baseboards, under furniture)
- Bed bug interceptors – small traps for bed and furniture legs
- Heat treatment – high temps (above 120°F) can kill all life stages
- Steamers – directed heat for upholstery and tight spaces
These tools won’t replace sprays but they’re fantastic support.
Common Mistakes to Avoid While Prepping
- Moving infested items to other rooms. BIG NOPE
- Forgetting to treat laundry hampers
- Using vacuum and not emptying it right away
- Leaving outlet covers and electronics in place
- Skipping walls and ceilings (bugs can climb!)
- Thinking one treatment is enough
Conclusion: Final Thoughts on Taking Control
Can we just pause and appreciate the fact that you made it this far?
That’s commitment. That’s strength.
Dealing with bed bugs is stressful. No sugarcoating that. But prepping your room properly is the biggest power move you can make. It’s the foundation for everything that follows. And you’ve got the knowledge now to do it right.
Let’s be honest—when your room is finally clean, treated, and bed-bug-free? That feeling is pure peace. Like a mental weight lifted.
You deserve that.
Please read more about the best bed bug spray.
FAQs
Do I have to prep every room?
If only one room shows signs, start there—but inspect and monitor surrounding rooms. Bed bugs spread fast.
Can I keep items under my bed?
Nope. Even in sealed bins, items can block treatment areas or become hiding places.
How long should I wait to sleep in the room?
Once the spray dries (4–6 hours), it’s safe to re-enter. Just follow any pro instructions carefully.
Are mattress encasements worth it?
Absolutely. They trap any surviving bugs inside and keep new ones out. Leave them on for at least a year.
What if I still see bugs after 2 weeks?
Don’t panic. Spray again or call in pros. Bed bugs can be persistent, but proper follow-up usually works.